Concert Photography Lesson 2
This is the second lesson in my concert photography course. Lesson 1 dealt with gear, and lesson 2 will focus on composition for music photographers and the basic shots you should try to get during a show. Not all these shots will be possible in a single 3-song set, but this is a rough guide to help those going into their first few events know what images they should aim for. Most of these ideas are what I teach my assistants before their first trip into the pit with me. Now, with that being said, it’s time for lesson 2.

Shooting concerts is a dirty job, but someone has to do it.
Trying to teach composition is like trying to teach someone to be creative—it is very difficult to do. However, when it comes to music or concert photography, there are certain kinds of shots that publications like to get. In this lesson, we will go over some of the different compositions you should try to get at each shoot you do. These are not really composition rules, but more guidelines that I give to my assistants when they start shooting gigs for me.
1. Vertical portrait
So, we will start off with the basic cover shot. This is a vertical portrait, basically, that is used by newspapers and magazines and will be your bread-and-butter image that most publications will require. More than 60% of all your photos should be vertical portraits.

GYZE
This should always be one of the first images that you get. When shooting in the pit, I always tell my assistants that there are three locations they should shoot from: the center of the pit, the far left, and the far right. It’s important to shoot from all three locations whenever possible for each shot. If the pit is packed with other photographers, it might not be possible to hit all three locations, but you should be able to hit at least two. The choice between the left or right location depends on the lead singer. More information about this will be provided later in the lesson.

GYZE
As soon as you have your vertical portrait, rotate your camera into horizontal mode and shoot a horizontal picture of the artist as well. That means two shots per location of each artist. Once you have your horizontal and vertical shot, it’s time to move to the next location as quickly as possible and shoot the same setup. By the time you have finished shooting all three locations, you should have six photos for each artist in the band, excluding the drummer. We will get to the drummers a little later in the article.
What is important to note when shooting this image is not to crop off the headstock (head of the guitar). Many of my assistants will come to me after their first show, and they would be shooting way too tight, ending up cutting off the headstocks. In a future lesson, I will tell you why that is important.

GYZE

GYZE
2. Open or closed side shots
When it comes to shooting singers, there are three options depending on the hand they use to hold the microphone. The first option is the open side. If the singer is holding the microphone in their right hand, then you want to shoot from the right-hand side of the pit so that you are capturing their open face. The singer’s arm and microphone will be hiding their face from the left-hand side. An example of shooting from the open side is shown below.

丝绒公路乐队 Velvet Road
Shooting the open side also refers to shooting from the opposite side of the guitar head, as the guitar headstock and the microphone tend to block the musician’s face. See the example below.

Coprolith
Shooting the open side in the pit should always be your first shot when capturing vertical portrait shots of the musicians. Before you go to the show, you should research the bands that you will be shooting and remember which sides are the open side and closed side for the musicians. More about preparing for a show will be covered in a future lesson.
It is possible to shoot the closed side of a musician, and you can get very good shots there, but they are more difficult to capture because the musician’s face is often hidden for long periods of time behind their microphone and arm combination, or their guitar.

Miss Mix

窒息乐队
Sometimes you have very little control over shooting open side or closed side as the singer will consistently pass the microphone from one hand to another. When this happens, all you can do is pick the side you think has the best lighting and wait to get the shot you want.
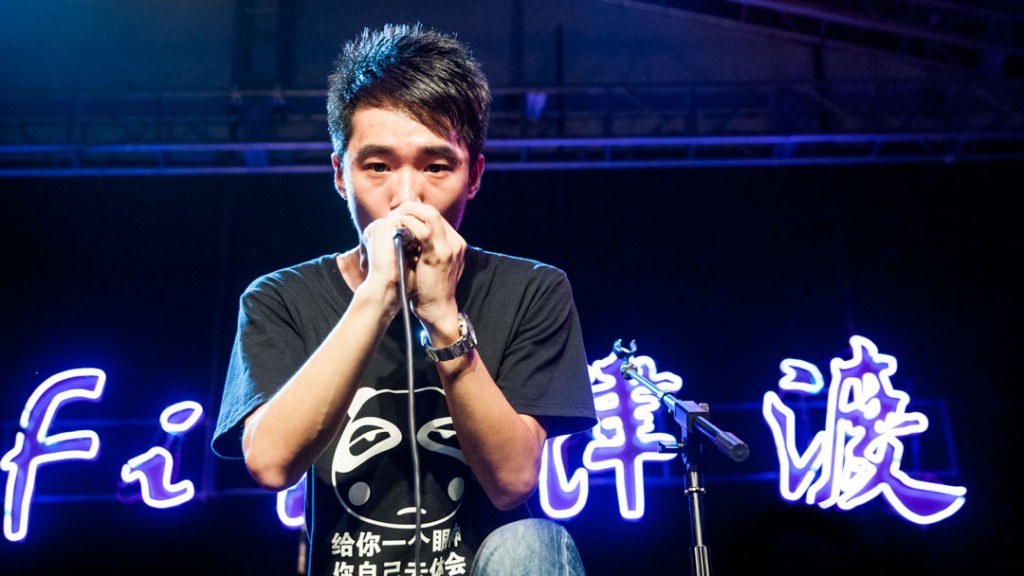
Now the last problem with shooting the open side or closed side is the horrible microphone eaters or huggers. These are the singers who hold the microphone in both hands and sing into it, completely blocking their faces. The best way I have found to deal with these kinds of musicians is to shoot them dead on and use their elbows to draw attention to their eyes. You create leading lines with their elbows to draw attention to their face or, in most cases, just their eyes. See examples below.

痛仰

零壹乐队 Voodoo Kung Fu

The eyes
But shooting straight on is not your only option. Depending on the artist, you can find some open gaps in their singing stances on stage and capture their face. However, this takes time and you do not always have the opportunity to go hunting for these moments. This is normally only possible if you have shot the band before and you know what to expect.

AK47
3. Boot on the monitor shot

GYZE

GYZE
This is a great shot for guitarists. They love seeing this shot, and so do many music magazines. Most guitarists will put their lead leg onto the monitor at some point while they are jamming away. Get to their open side and capture the shot if you can. Most guitarists will do this a few times during their set, so if you see it but miss it, just work your way over to that side of the pit and prepare for it. As for the composition of this shot, if you crop a bit of the boot, that’s fine—just don’t crop their upper body or their guitar.
4. Rule of thirds and the eyes
The rule of thirds is one of the oldest photography guidelines when dealing with composition, and it applies to concert photography with one little addition that should be followed. The direction of the eyes determines the composition of the rule of thirds.

GYZE

GYZE
No matter if you are shooting horizontally or vertically, the eyes should always be looking into the negative space in the image.
5. The eyes are the soul of the image.

Nova Heart
One problem you will run into many times is the issue of the eyes. To be very blunt about this, no matter how good the photo is, if the musician has their eyes closed in the shot, the shot is almost always useless unless there is some great display of emotion on their face. Many of my assistants follow my composition guidelines perfectly, but they bring me shots with closed eyes, and then the shots are worthless. I have also lost great shots because I shot the musicians as they blinked. This will happen to everyone at times, and it is something you have to learn to deal with.

二手玫瑰乐队
Sunglasses are your friend. If a musician is wearing sunglasses, then you don’t have to worry about their eyes, but we are not always that lucky. The worst possible luck you could get is a folk or pop singer who always closes their eyes when they sing. Again it comes down to emotion, if their eyes are closed but they have a great emotional display on their face, then it is fine. But if there eyes are close, then the shot is useless.

宋冬野
I had to learn how to cheat the system to get shots of these types of musicians. When they sing, they always close their eyes, so no matter how patient you are, there is no shot to get. However, they love to talk to the crowd in between their songs, and then their eyes are open, allowing you to get the shot for your publication. It is cheating because they are not performing, but your publication or the viewer will never know that.

宋冬野
6. Group shots.
The next photo that you should be looking to take is group shots or interaction shots between the band members. These shots are usually done in horizontal mode, and you shoot them as they happen. You have to be prepared for when they occur and shoot them quickly. You have to watch your depth of field with these shots, especially if you are shooting from the side of the pit. A group shot with one person out of focus is no good and cannot be used. So, these shots are much easier to take from the central location in the pit. Always remember that the depth of field decreases as focal length increases.

GYZE
7. Full Stage shot

窒息乐队
This can be a tough shot to nail, and a lot depends on the stage you are shooting. You will absolutely need a super-wide zoom to get this shot and a bit of luck. The shot doesn’t sell well to publications, but bands love the full-stage shot and often use them on their social media accounts. If you are shooting on a huge stage and the pit is really small, then this shot is not really feasible, but if you can get it, you should always take the shot.
8. The Drummer shots

GYZE
Shooting the drummer can be very difficult. The drummer is usually at the back of the stage with terrible lighting, and you need a much faster shutter speed to shoot them than other members of the band. Adding to all of this, the drummer is often blocked by other band members, so getting a clear shot is not always easy. The best location is usually center stage, using a long zoom to shoot straight past the lead singer. This way, you should be able to get a few shots of the drummer. Try to get a vertical and horizontal shot of the drummer while they are either on their downswing or playing with their drumsticks. Nailing the drummer shot is not easy and takes time and practice.

Octopuss Band
If possible, I always try to get a vertical shot of the drummer, as most drummers are looking for profile pictures for their social media accounts, and they will crop your horizontal shot to get their profile pic, so you may as well shoot one for them.
Now, if you have an all-access pass and stage access, things get a little easier. You can get a variety of shots. If you have stage access, you want to shoot the drummer from both sides of the stage in horizontal mode.

Cypher 16

RIP乐队

Sweet甜乐队
The final shot that you should always try is by going to the back of the stage area, most of the time you can find a small hole through which to shoot the drummer from.

Sweet甜乐队
I will do a separate lesson on drummers in the future. They are difficult to shoot but if you can get access to the stage, there is so much that you can do with them. I love shooting drummers so I always push my assistants to try and shoot them as well.
9. Breaking the third wall
Most bands are there to perform to the crowd, and the photographer is not part of that equation. However, if you start to get known by the bands, sometimes the artists will start to ham it up and play for you. You can get some great shots when they do this, but personally, I prefer to be ignored while working.

帕恩乐队PAN

躁音门乐队NoiseGate

Getting nice and close to the action
That is me shooting the shot above. Once you have a good rapport with the bands, then getting unique shots is always possible.
10. Always shoot the signs.

重獸乐队

玉麟军乐队

annalynn

NeverBefore乐队
Anytime a musician motions or makes a sign to the crowd, shoot it. In China, the horns are extremely popular, all the musicians do it, and I will shoot it every single time I see it. Even if you are in the worst possible position in the pit, if you see the artist on stage making a sign, shoot it as best as you can.
11. Hide the lights
Now, this is something that I try to get all my assistants to do. I encourage them to use the artist they are shooting to hide the stage light behind the artist’s head. This will create a halo-like effect around the artist, as if they are being backlit, and if you are lucky, you will get some nice light rays as well.

九宝 Nine Treasure band

扭曲机器
12. Include the crowd

The bass player from 萬重 doing a little crowd surfing during their set on stage


肆伍乐队

Octopuss Band
The crowd is a vital part of any show, so trying to find an angle in the pit or from the stage to include the band with the fans is very important. If you are lucky, a band member will go crowd surfing or stand on the security barricade. If you are not so lucky, you can either shoot from the side of the stage to include the band with the crowd or if the stage and the pit are small, you can stand as close as possible to the stage and shoot with a super-wide lens, including the crowd and the artist in the same shot.
13. Soundcheck

Emergency Gate

LFD乐队

If it is at all possible, shooting the sound check is a great way to get some images of the artists in a more relaxed state of mind. They are not performing at that time, and you can get some really nice intimate images. However, you must have access to the sound check. Sneaking into the sound check to shoot is never a good idea, as you could lose your pass to the show if you are caught.
14. Jumping shots, hair flicks, and stomp shots
I like to group these three shots into one category because they are all equally hard to get and take time and practice to be able to shoot them. I will detail in a future lesson how to improve your luck in getting these kinds of shots, but if you are in the pit, you should always be on the lookout for these shots.

Toss Band

塔罗圣徒乐队

Crack band
15. The Grand finale

郝云

Crowd shot TongYang Miserable Faith group shot

画皮乐队
Shooting the band’s group photo just as a show ends is very important. Again, these photos are not too popular with publishers, but they are hugely popular with the bands. I will move heaven and earth to make sure I am on stage to shoot this shot at the end of each show. In the beginning, if you are new to the scene, you will only be able to shoot the first type of composition from the pit. But as you get to know the different venues and make friends with the local security guards working the shows, you will be able to get on the stage to capture the shot of the band and the crowd together.
16. Environmental shots

痛仰乐队 Miserable Faith

COB at Taihu MIDI
Shooting environmental shots is really difficult because it generally means you have to leave the pit, so they are usually taken after your time in the pit is over. The difficulty in getting these shots is that many venues will kick you out after your time is up. They might even drag you by the arm to the exit and tell the security staff that you cannot come back in for that show. But if you find yourself with time to shoot one of these shots, you need to get to the side of the stage or straight on in an elevated position and shoot down onto the stage. For these shots, the musicians are not the focal points; the crowd and the lighting are the important parts. To be honest, I suck at these shots and seldom go for them. I usually give one of my assistants the task of getting the shot for me. For a lot of outdoor venues, that means climbing up trees or small buildings and shooting from them.
17. Crowd shots
I love shooting the crowds at concerts and music festivals. They are the heart and soul of any event, and it is extremely important that you capture them. You cannot be timid when dealing with the crowd—you have to shoot them. This is one time when using flash is okay. I always use flash on my crowd shots, even in the daytime. Flash helps to freeze their motion and eliminates any nasty shadows around their eyes. Most of the crowd will have almost no lighting on them at night, so they will be extremely dark. But if you are going to use flash, make sure the security knows that the flash is for the crowd only. If they think you are going to use flash on the artists, they will kick you out.

Taihu Midi
18. What not to shot
There are things that you should not be shooting, or if you do, do not publish them. The music scene is filled with musicians who have many loyal fans, and sometimes these loyal fans happen to be very pretty girls who would do anything for their idols. When you see a musician backstage with some girls or boys, don’t shoot it. The same goes for drinking. All musicians drink, if they get drunk or do something crazy, don’t go publish the image and cause them embarrassment.
The music community is really tight and if you do something that hurts one musician, I can guarantee you that he will never want you or your publications to shoot him again, and he will tell his friends and it can lead to a vicious circle. Be smart, and do a professional job. Don’t be a paparazzi. Secondly, don’t be a fanboy and ask to take selfies with the artist. Asking to take a selfie with a musician is the fastest way to lose all credibility with them. If you present yourself as a professional, you will get treated like one, or at least you should be treated like that.
I always give my assistants this final piece of advice when they first start to work for me. If we shine some light on the musicians, they will often return the favour a hundredfold. I have found this to be very true, so many bands here in China will get me passes to events, give me stage access that no one else has, backstage access or give me access to the dressing room. Musicians should be your friends, and never someone you prey on. Both of you need to make a living, so doing it in a way that is mutually beneficial is always the best option.

Next week, we will be going over overexposure and how to set and maintain it during a show.
If you have any questions about this lesson or any questions in general about music photography, just leave a comment below, and I will answer it as soon as I have some free time.
Until next week, happy shooting.
Shaun.